本文共 4149 字,大约阅读时间需要 13 分钟。
文章目录
前言
KMP算法可以说是知名度非常高的算法了,不管是数据结构课本还是各大论坛都对这个算法进行过深入讲解,但遗憾的是,还是把大部分人给劝退了。
一:情景导入-如何快速在一个主串找到目标字符串
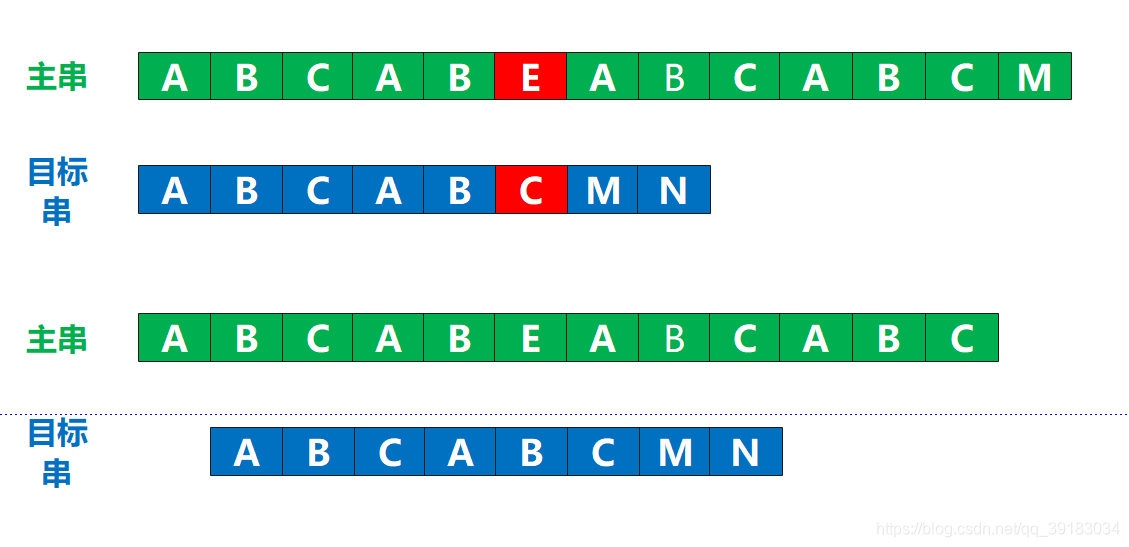
如下有两个字符串,问你:如何快速在主串中找到目标串?

当然我们说的是算法,请你不要回答“肉眼搜索之类的话题”(当然如果这个主串有一亿个字符我相信你这辈子也不可能找出来)
回归正题,相信大家想到的第一个解决方法就是暴力破解——用两个指针,开始时分别指向两个串的开头,然后比较,如果相同继续扫描下一个字符,一旦出现不相同,两个指针进行回溯,主串的指针回溯到下一位,目标串的指针晦朔至第一位,然后继续按照上述步骤比较
直接用图片描述如下,需要注意的是,回溯的步骤在图中表示为了目标串向后移动的,但是实际物理内存中字符串是不可能移动的,这里只是为了形象解释
 由此,你可以写出对应的暴力匹配代码
 int index(string main_str,string aim_str){ int i=0; int j=0;//i和j分别用来扫描主串和目标串 while(i<=main_str.size()-1 && j<=aim_str.size()-1) { if(main_str[i]==main_str[j]) { ++i; ++j; } else { j=1; i=++k; } } if(j>aim_str.size()-1) return k; else return 0;} 暴力匹配是可行的,但是时间复杂度一看就很高,所以KMP算法正是为了解决如何快速在主串中找到目标串而生的,而且它真的很快。
二:详解KMP
为了便于介绍,我将主串和目标串设置为这样(当然,下面的例子中主串中是没有目标串的,但是不要紧,我只是为了说明更好的说明,有没有都一样)

(1)暴力匹配的缺点
通过上面的那么长的一张图,,大家可能已经发现了暴力匹配的缺陷所在——对,就是回溯太频繁了,只要找不到就回溯到下一位
 这里如果让你进行回溯的话,你肯定不会呆呆的直接回溯的下一位,起码得下面这样吧
  为什么?因为主串只有第一个位置是A,而这种匹配的尝试已经失败了,但是它第2,3位都不是A,既然都是A,那我还干嘛回溯到这里?直接从第4位开始不好吗?
 所以KMP的算法的核心点就在这里:不要回溯到无效的地方,让其回溯到有效的位置
(2)最长相同前缀和后缀
在讲下面前,必须引入一个概念——一个字符串的最长相同前缀和后缀。
关于这个问题,其实很多数据结构的书解释的都太过复杂了,甚至总是爱拿出一套公式把你劝退要想知道什么是最长相同前缀和后缀,首先得明白什么是字符串的前缀和后缀,看完下面这个图相信你就不难理解了

那么,最长相同前缀和后缀你也应该能找出来了吧
 什么?竟然不是最下面的那个吗?这里就要给大家说明一点,最长相同前后缀不能是字符串本身,因为如果你认为最长相同前后缀可以是字符串本身的话,那么这就是一个恒成立的命题了,那么KMP算法还玩什么?
 (3)究竟怎么回溯
前面讲过,KMP算法的核心问题就是处理如何有效的回溯的问题。
再把之前那个应该这样回溯的图拿来,注意观察 你有没有发现它回溯的位置有些特点?没错!就是最长公共前后缀重合的地方,也就是说让最长相同前缀对齐至后缀。
 下面的话一定要认真理解,这是你是否能理解KMP算法以及明白为什么要有next数组的关键所在。首先请问目标串发生不匹配时的索引是多少?,是5对吧,然后咋们回溯的时候请问目标串的哪个位置(或者说索引)与主串的不匹配位置(也就是5)“对齐了”?很明显是目标串的2号位置,你有没有发现——这个2恰好就是目标串发生不匹配位置前的字符串的最长前缀和后缀的长度!
好的如何你能理解上面的部分,那么KMP算法的思想算是已经明白了。
(3)next数组
进过上面的叙述,我们可以意识到,这种回溯是有规律的,并不是凭空臆想的。
再举几个例子 如下目标串的索引为3号的位置发生不匹配 其3号位置前的字符串的最长相同前后缀的长度是1,所以就应该让目标串索引为1的位置与该不匹配处“对齐”
  再来,如下目标串的索引为5号的位置发生不匹配
  其5号位置前的字符串的最长相同前后缀的长度是2,所以就应该让目标串索引为2的位置与该不匹配处“对齐”
  我讲到这里,大家应该可以明白了,也就是匹配时根本就“不需要”主串,因为每个位置发生不匹配时,总有一个值能确定其应该回溯的位置。这个值就是其前面的字符串的最长相同前后缀的长度
 我们把目标串每个位置发生不匹配时,目标串应该回溯的位置给记录下来,形成一个数组,这个数组就是大名鼎鼎的next数组,next[i]=j,就表示索引为i的位置发生不匹配,就让其回溯的j的位置继续匹配
next数组的计算方法我其实前面已经说到过了,如下目标的串next数组计算如下,需要注意是由于第一个位置也就是next[0]前面没有串,所以记为-1

| A | B | C | A | B | C | M | N |
|---|---|---|---|---|---|---|---|
| next[0] | next[1] | next[2] | next[3] | next[4] | next[5] | next[6] | next[7] |
| -1 | 0 | 0 | 0 | 1 | 2 | 3 | 0 |
好,依据next数组我们就能确定目标串的回溯位置了,比如下面假设目标串和主串在索引为4的位置发生不匹配,所做的操作如下

(4)求解next数组
KMP算法的思想大部分人是能很轻松的明白的,但是这个算法为什么劝退了很多人呢?就是无法准确,深刻的理解求解next数组的代码
void getnext(string target_str,int next[]){ int j=0,k=-1; next[0]=-1; while(j 你说它长也就算了,毕竟是一个具有难度的算法,但是它偏偏这么短,这就让人很尴尬。
上述代码中总共有三个地方如果能理解清楚这个代码也就没问题了。
next[0]=-1,next[j]=l,k=next[k],其中k=next[k]最让人摸不着头脑 A:next[0]=-1
首先是next[0]=-1,如下当目标串的第一个位置,也就是索引为0的位置,发生不匹配时,应该让目标串的索引为-1的位置与当前不匹配的地方对齐比较
 好的,我知道你肯定回文,怎么可能有-1的位置啊,这明显越界了啊?你先不要管这些,我就问你,这种情况下,是不是应该是目标串的第一个位置与主串的下一个位置进行比较? 是的,的确是这样,所以我这里先截取,KMP算法的一小段(不要担心你肯定看得懂)
  上面的
上面的j=next[j]不用不说在干什么了,好的回到上面的问题,此时就是执行结果就是-1=next[0],也就是j=-1了,然后重新回到循环,继续判断,此时j=-1,进入if内,注意i++,j++,请问i++是在干什么?,而j++会等于0,这不就是让目标串的第一位与主串的下一位比较吗 所以你现在能理解为什么next[0]=-1了吧
B:next[j]=k
首先next[j]=k我认为大家肯定能明白的一点就是在为next数组进行位置,但是不明白的是为什么下标为j的元素的值是k
那么我想问哪种情况下会有next[j]=k?,根据上面的代码自然是k=-1或str[j]=str[k]的时候。
好的现在,我们先考虑k=-1,当k=-1时,总会有k++,使得k变为0,这样的话next[j]=0,表明前面没有相同的前后缀
那么一旦k不是-1,满足这个if的唯一条件就是str[j]=str[k]了。如果此刻str[j]=str[k],这就表示此时的位置可以算作相同的前后缀了,我们所做的就是判断下一对了。
 非常幸运,他们相同,于是
j++,k++,next[j]=3 
C:k=next[k]
我认为kmp算法的高潮部分就在这里!(为了方便说明,我换了一张图)
如下,j和k准备比较下一个
很遗憾这个位置,无法使其成为长度为4的相同前后缀,那么根据代码只能执行k=next[k]了
这样画比较难受,我把前缀直接拿到下面来 有没有似曾相识的感觉?没错,好像是主串和目标串,但是这不是原来的那个两个串。而是后缀作为了主串,前缀作为了目标串,好的,现在前缀(目标串)的下表为3的位置发生了不匹配,该怎么做?这不用问我吧,当然是让前缀(目标串)下标为1的位置(next[3]=1)与该不匹配处重新比较
  好的,重新组装回去,毕竟这不是真的主串和目标串
  好的,现在if的判断是否满足,当然满足,对应位置相同,那么继续i++,j++,于是next[9]=2,此时next数组全部赋值完成。
 这就是为什么这样回溯的原因!
仔细想一想,下面的这种情况中已经不可能有ABAB,ABAC相等的情况存在了,因为一旦相同,那么next[9]=4了,也即是C之前不可能有长度为4的相同的前后缀,但是没有这么长的或许也有短的呀,你看咋们上面的那个AB=AB不就是一个短的情况吗,所以这也就是为什么有k=next[k]这样的回溯的情况。其实就是在前缀和后缀在比较,只不过一旦遇到不相等,前人栽树后人乘凉罢了!如果你能理解最后的那句谚语,那么这个算法你应该掌握的八九不离十了,这里也可以看出这个算法有多么的牛逼,简直即使巧妙之际,不得不佩服发明的这三位大牛的聪明才智啊

(5)KMP算法代码
我觉得不用我再解释了吧
int KMP(string main_str,string target_str){ int next[MaxSize],i=0,j=0; getnext(target_str,next); while(i =target_str.size()) return i-target_str.size();//返回目标串在主串的第一个字符的位置 else return -1;//找不到返回-1} 转载地址:http://mjsi.baihongyu.com/